TL;DR
Three ideas before you begin
- Gemini 2 is a duplicate-file utility, not a generative AI assistant
- Automatic selections require human preview
- Move items to Trash first and delete permanently only after verification
Before you start
Prepare the inputs
- Back up important files first
- Close apps writing to the target folders
- Choose scan folders and explicit exclusions
Step 1
From “Back up and narrow the scan scope” to “Exclude system and app data”
To produce “A backed-up, manually reviewed, and recoverable duplicate-file cleanup”, make “Back up and narrow the scan scope” and “Exclude system and app data” a reviewable starting point. Every later filter and judgment should preserve this scope.
- 1.1
Back up and narrow the scan scope
Back up work documents and photo libraries, then scan one ordinary folder first instead of starting with the entire system disk.
- 1.2
Exclude system and app data
Do not scan or remove unfamiliar system folders, app bundles, virtual machines, development environments, or internal sync-service data.
Important data is backed up and scan and exclusion folders are documented.
Step 2
“Scan and review by category”, then “Review automatic selection group by group”
Keep only the evidence needed for “Scan and review by category” and “Review automatic selection group by group”. Record why each filter changes so the result remains reproducible instead of becoming an unexplained screenshot.
- 2.1
Scan and review by category
Review exact duplicates first, then similar photos separately. Similar does not mean disposable—check clarity, edits, and capture time.
- 2.2
Review automatic selection group by group
Ensure every group keeps the correct file and location, and deselect project sources, aliases, or unfamiliar paths.
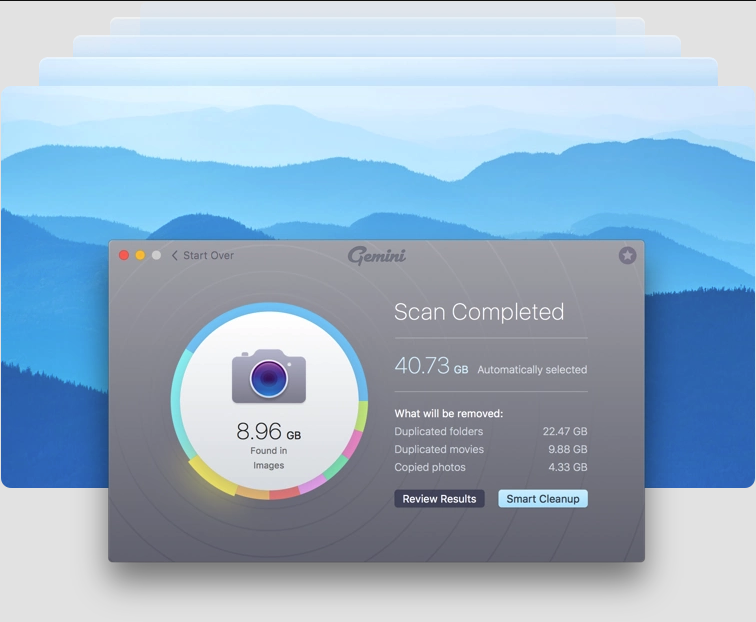
Review automatic selections before deciding whether to clean. Markers- 1 Removal categories
- 2 Review each group
- 3 Smart cleanup
Open Review Results and inspect each group before relying on automatic selection. Move to deletion only after recoverability and manual review are confirmed.
Verify source: MacPaw official Gemini 2 scan results interface
Every deletion group has a confirmed keeper and a reason for removal.
Step 3
“Use a recoverable removal method” and “Regression-check important files”
Do not stop at tool output. Use “Use a recoverable removal method” and “Regression-check important files” to verify quality, limitations, and ownership so “A backed-up, manually reviewed, and recoverable duplicate-file cleanup” becomes actionable.
- 3.1
Use a recoverable removal method
Move items to Trash rather than erasing immediately and record freed space and affected folders.
- 3.2
Regression-check important files
Reopen photo libraries, projects, and common apps and confirm links, assets, and sync before deciding when to empty Trash under the backup policy.
The cleanup is verified and remains recoverable from Trash or backup during the retention period.
WHO · HOW · WHY
How this guide was written and reviewed
- Who
- Independently written and manually reviewed by the RelayX Editorial Team, with update and capture dates shown on the page.
- How
- Use least privilege, recoverable actions, and current product state as the baseline. Verify source, version, backup, and rollback paths before installing, authorizing, or deleting anything.
- Why
- The goal is not to restate product features but to help you produce “A backed-up, manually reviewed, and recoverable duplicate-file cleanup”. The workflow is organized around that outcome with checkpoints, limitations, and next actions.
Interface captures come from official accessible product pages or the current browser interface. Each appears under its matching step with numbered controls and data points. When real functional UI cannot be publicly verified, the guide says so instead of using a marketing homepage as filler. No third-party tutorial text or imagery is reused; third-party brands and interface rights remain with their respective owners.